🚀 Getting Started
🔒 Private Server
To enhance privacy and control, you can host your own private server. This keeps all message data within your infrastructure while maintaining push notification capabilities through our public server at api.sms-gate.app. This setup eliminates the need to configure Firebase Cloud Messaging (FCM) or rebuild the Android app, but it does demand some technical know-how.
flowchart
    %% === MAIN BLOCKS ===
    Users["👥 Users"]
    Android["🤖 SMSGate App"]

    subgraph PrivateServer["Private Server"]
        GoServerPrivate["🐹 Server"]
        GoWorkerPrivate["🐹 Worker"]
        DB["🦭 DB"]

        GoServerPrivate <--> DB
        GoWorkerPrivate --> DB
    end

    subgraph Google["Google"]
        FCM["🔥 FCM"]
    end

    subgraph PublicServer["Public Server"]
        GoServerPublic["🐹 api.sms-gate.app"]
    end

    %% === CONNECTIONS ===

    Users -->|REST API| GoServerPrivate
    GoServerPrivate -->|notification| GoServerPublic
    GoServerPublic -->|notification| FCM
    FCM -->|PUSH| Android
    Android <--> GoServerPrivate

    %% === ALTERNATIVE NOTIFICATION PATH ===
    Android -.->|SSE| GoServerPrivate

    %% === STYLING ===
    classDef altConn stroke-dasharray: 5 5,stroke:#888,fill:none;
    class Android,GoServerPrivate,GoWorkerPrivate,DB altConn;
When to Choose Private Mode
- 🏢 Enterprise deployments requiring full data control
- 🔐 Enhanced security compliance needs
- 📈 Messaging rate exceeds Public Server limit
- 🌐 Custom integration requirements
Prerequisites ✅
The easiest way to run the server is to use Docker. For alternative installation methods, see Private Server Documentation.
To run the server, you'll need:
- 🐧 Linux VPS
- 🐳 Docker installed
- 🗄️ MySQL/MariaDB server with empty database and privileged user
- 🔄 Reverse proxy with valid SSL certificate (project CA supported)
Run the Server 🖥️
-
Create configuration
Copy the example config and customize:Get config.yml templateKey sections to edit:wget https://raw.githubusercontent.com/android-sms-gateway/server/master/configs/config.example.yml -O config.ymlPrivate Server Configuration Examplegateway: mode: private private_token: your-secure-token-here # (1)! http: listen: 0.0.0.0:3000 database: # (2)! host: localhost port: 3306 user: root password: root database: sms timezone: UTC- Must match device configuration
- Must match MySQL/MariaDB configuration
Configuration Location
By default, the application looks for
config.ymlin the current working directory. Alternatively, you can set theCONFIG_PATHenvironment variable to specify a custom path to the configuration file. -
Launch the server
-
Run the background worker (optional)
Docker Commanddocker run -d --name sms-gateway-worker \ -v $(pwd)/config.yml:/app/config.yml \ ghcr.io/android-sms-gateway/server:latest \ /app/app workerThe background worker handles maintenance tasks. See Background Worker for setup details.
-
Configure reverse proxy
Example Nginx Configlocation / { proxy_pass http://localhost:3000; proxy_set_header Host $host; proxy_set_header X-Forwarded-For $remote_addr; }See
Reverse Proxy Configurationfor setup details and advanced options.
Verification
Test server accessibility:
Configure Android App 📱
Important
Changing servers will reset credentials and require device re-registration!
-
Access Settings
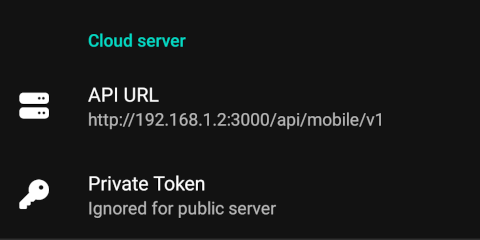
Navigate to Settings tab → Cloud Server -
Enter server details
API URL Path
The API URL must include the
/api/mobile/v1path. Using just the base URL (e.g.,https://private.example.com) will not work.HTTPS Required
The Android app requires HTTPS for all communications with your private server unless you use an insecure build variant. Using HTTP will result in connection failures.
To obtain a valid SSL certificate:
- Use Let's Encrypt for a free, trusted certificate
- Use our project CA for private IP addresses or internal domains
- Use a tunneling service like ngrok or Cloudflare Tunnel for testing
-
Activate connection
- Switch to Home tab
- Activate Cloud server switch
- Tap the "Offline" button to initiate the connection and registration process
- Wait for the app to establish connection (button will change to "Online")
Successful Connection
After successful connection, credentials will be automatically generated and appear in the Cloud Server section:
Automatic Registration
No manual registration step is required. Username and password are generated automatically on the first successful connection to the server.
Using the API 📡
All API interactions with the SMSGate use the same request format and authentication methods, but the URL structure differs between Cloud and Private server modes.
URL Structure Comparison
| Component | Cloud Server | Private Server |
|---|---|---|
| Base URL | https://api.sms-gate.app | https://your-domain.com |
| API Path | /3rdparty/v1/... | /api/3rdparty/v1/... |
| Full Example | https://api.sms-gate.app/3rdparty/v1/messages | https://your-domain.com/api/3rdparty/v1/messages |
Why the Difference?
The cloud server uses URL rewriting where the domain api.sms-gate.app already contains the api part. With a private server, you need to explicitly include /api in the URL path.
Example: Sending a Message
# Cloud Server
curl -X POST "https://api.sms-gate.app/3rdparty/v1/messages" \
  -u "username:password" \
  -H "Content-Type: application/json" \
  -d '{"phoneNumbers": ["+1234567890"], "textMessage": {"text": "Hello"}}'

# Private Server
curl -X POST "https://your-domain.com/api/3rdparty/v1/messages" \
  -u "username:password" \
  -H "Content-Type: application/json" \
  -d '{"phoneNumbers": ["+1234567890"], "textMessage": {"text": "Hello"}}'